Documentation
This package allows you to give your users a beautiful way to upload images to your application and manage their library. It integrates with and is based on Spatie MediaLibrary, one of the most popular and widely used packages in the Laravel ecosystem.
Upgrading from V1 to V2?
#Features
- Media library page in your application.
- Custom field to select a media item.
- Multiselect (NEW IN V2)
- Folders (NEW IN V2)
- Table column to display a media library item (NEW IN V2)
- Custom forms when viewing/editing an image (NEW IN V2)
- Integration with Spatie MediaLibrary.
- Bulk-upload images.
- Responsive images.
- Ability to add items outside of Filament Admin.
- Beautiful design & integration with Filament Admin.
- Support for dark mode. 🌚
- Can be easily translated with a language file.
- Can be used outside the admin panel, with only the Form Builder.
- Register your own media conversions.
- Upload images, SVGs, PDFs and videos.
- Support for policies.
- Search through image names and filenames.
- Support for all filesystem disks, both public and private, including S3.
- Performant UI (IMPROVED IN V2)
- Replace image (NEW IN V2)
- Ability to show upload box by default (NEW IN V2)
- Show a warning when there are unstored files in the upload box (NEW IN V2)
- Customisable button label for the media picker (NEW IN V2)
- Sorting files & folders (NEW IN V2)
- English, Dutch and Italian translated included & translatable in any language
View changelog
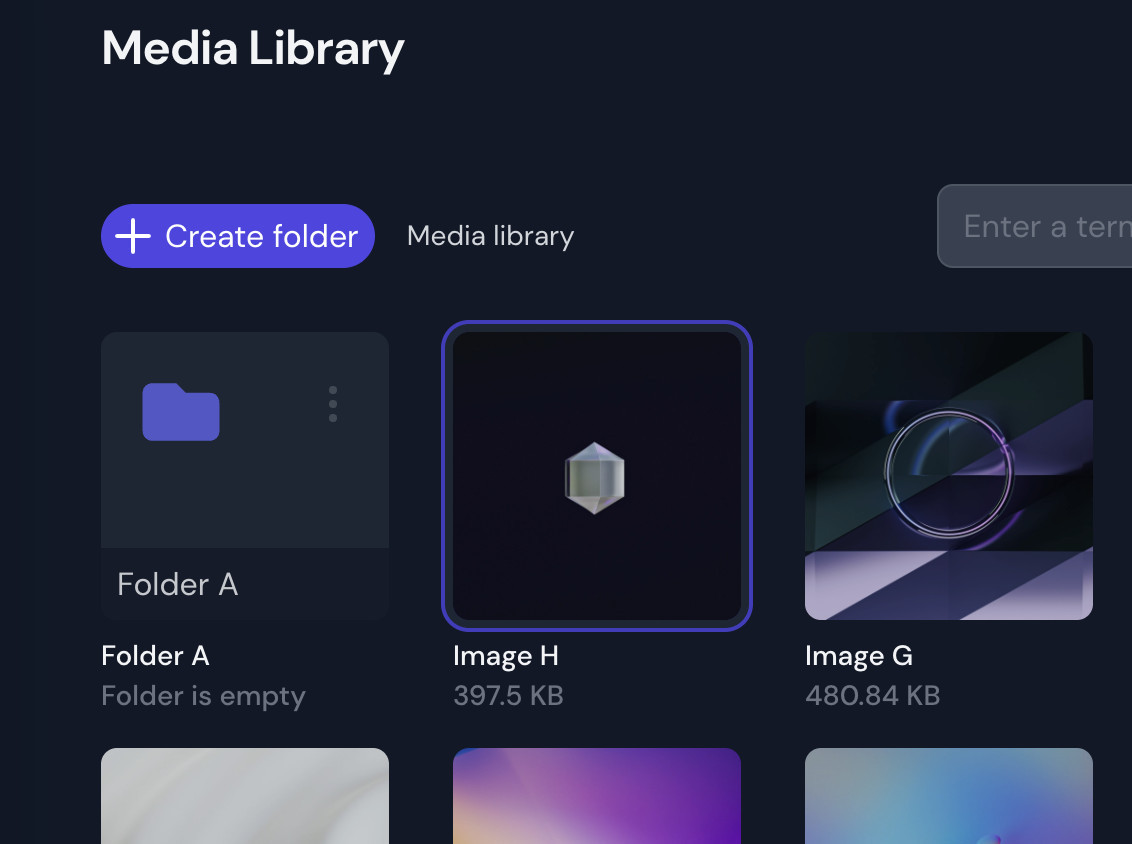
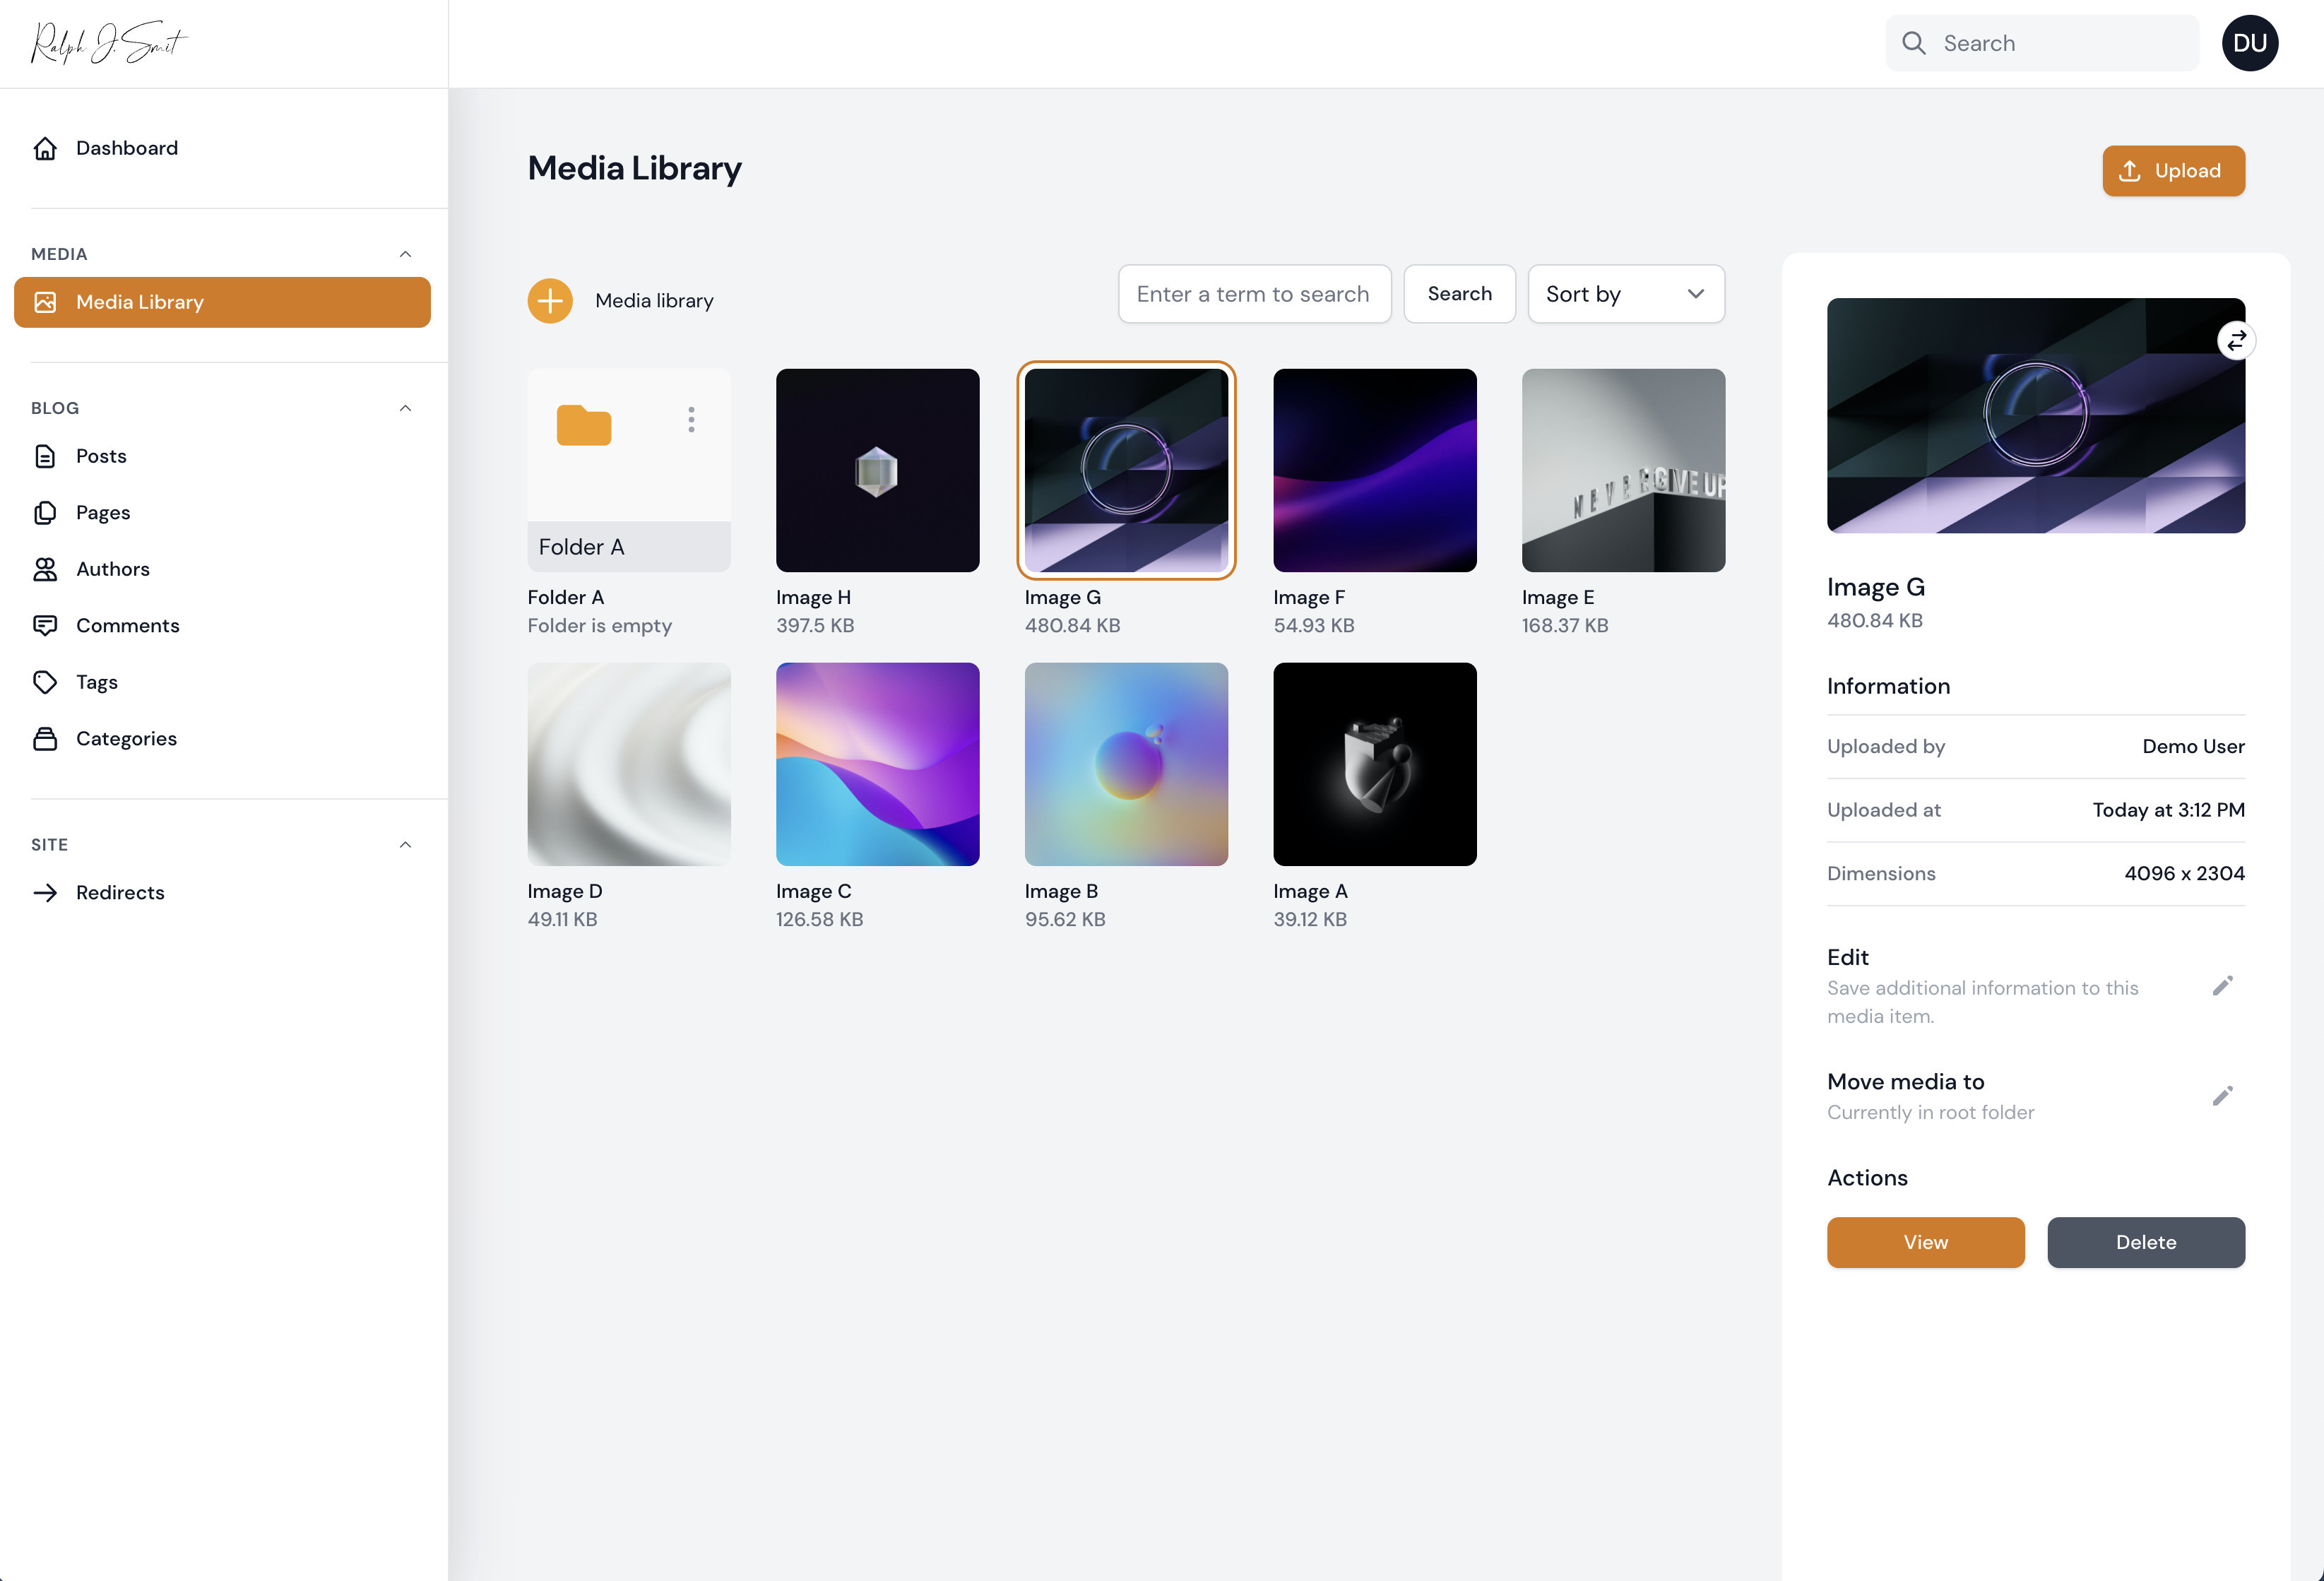
#Screenshots
#Library (light and dark mode)
The MediaLibrary page is the page where your users can view all their images. The complete package is compatible with both dark- and lightmode.
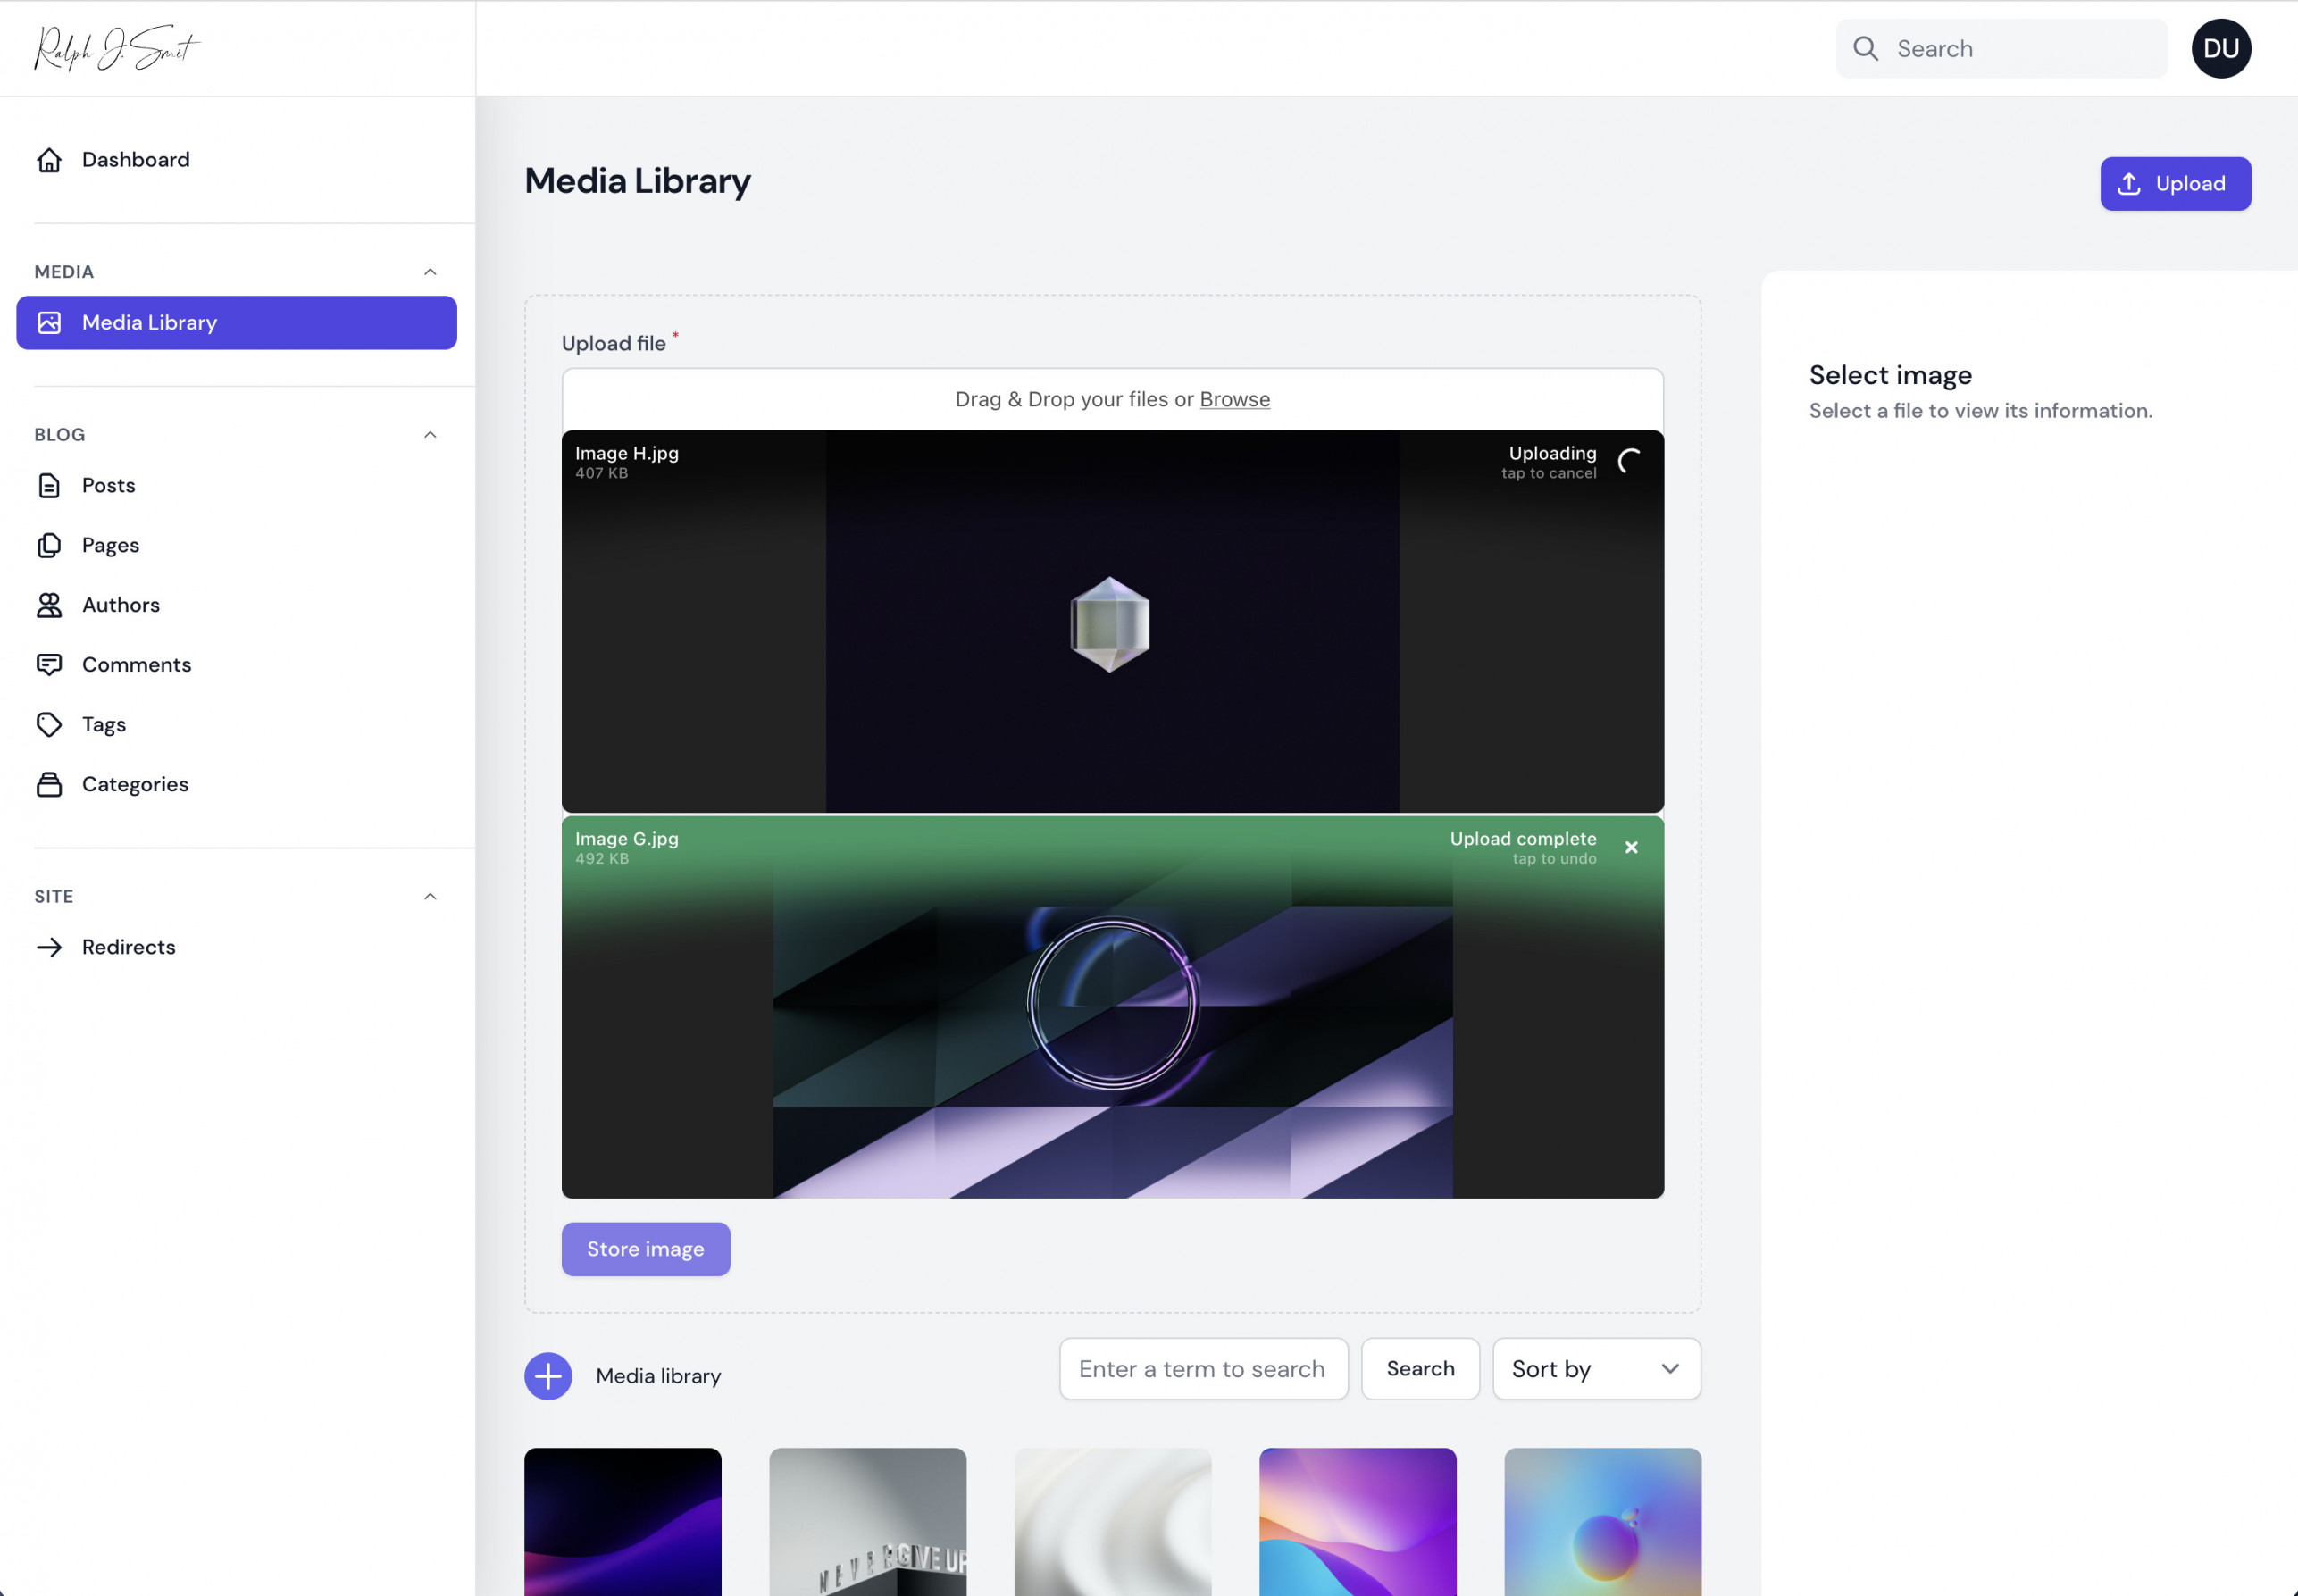
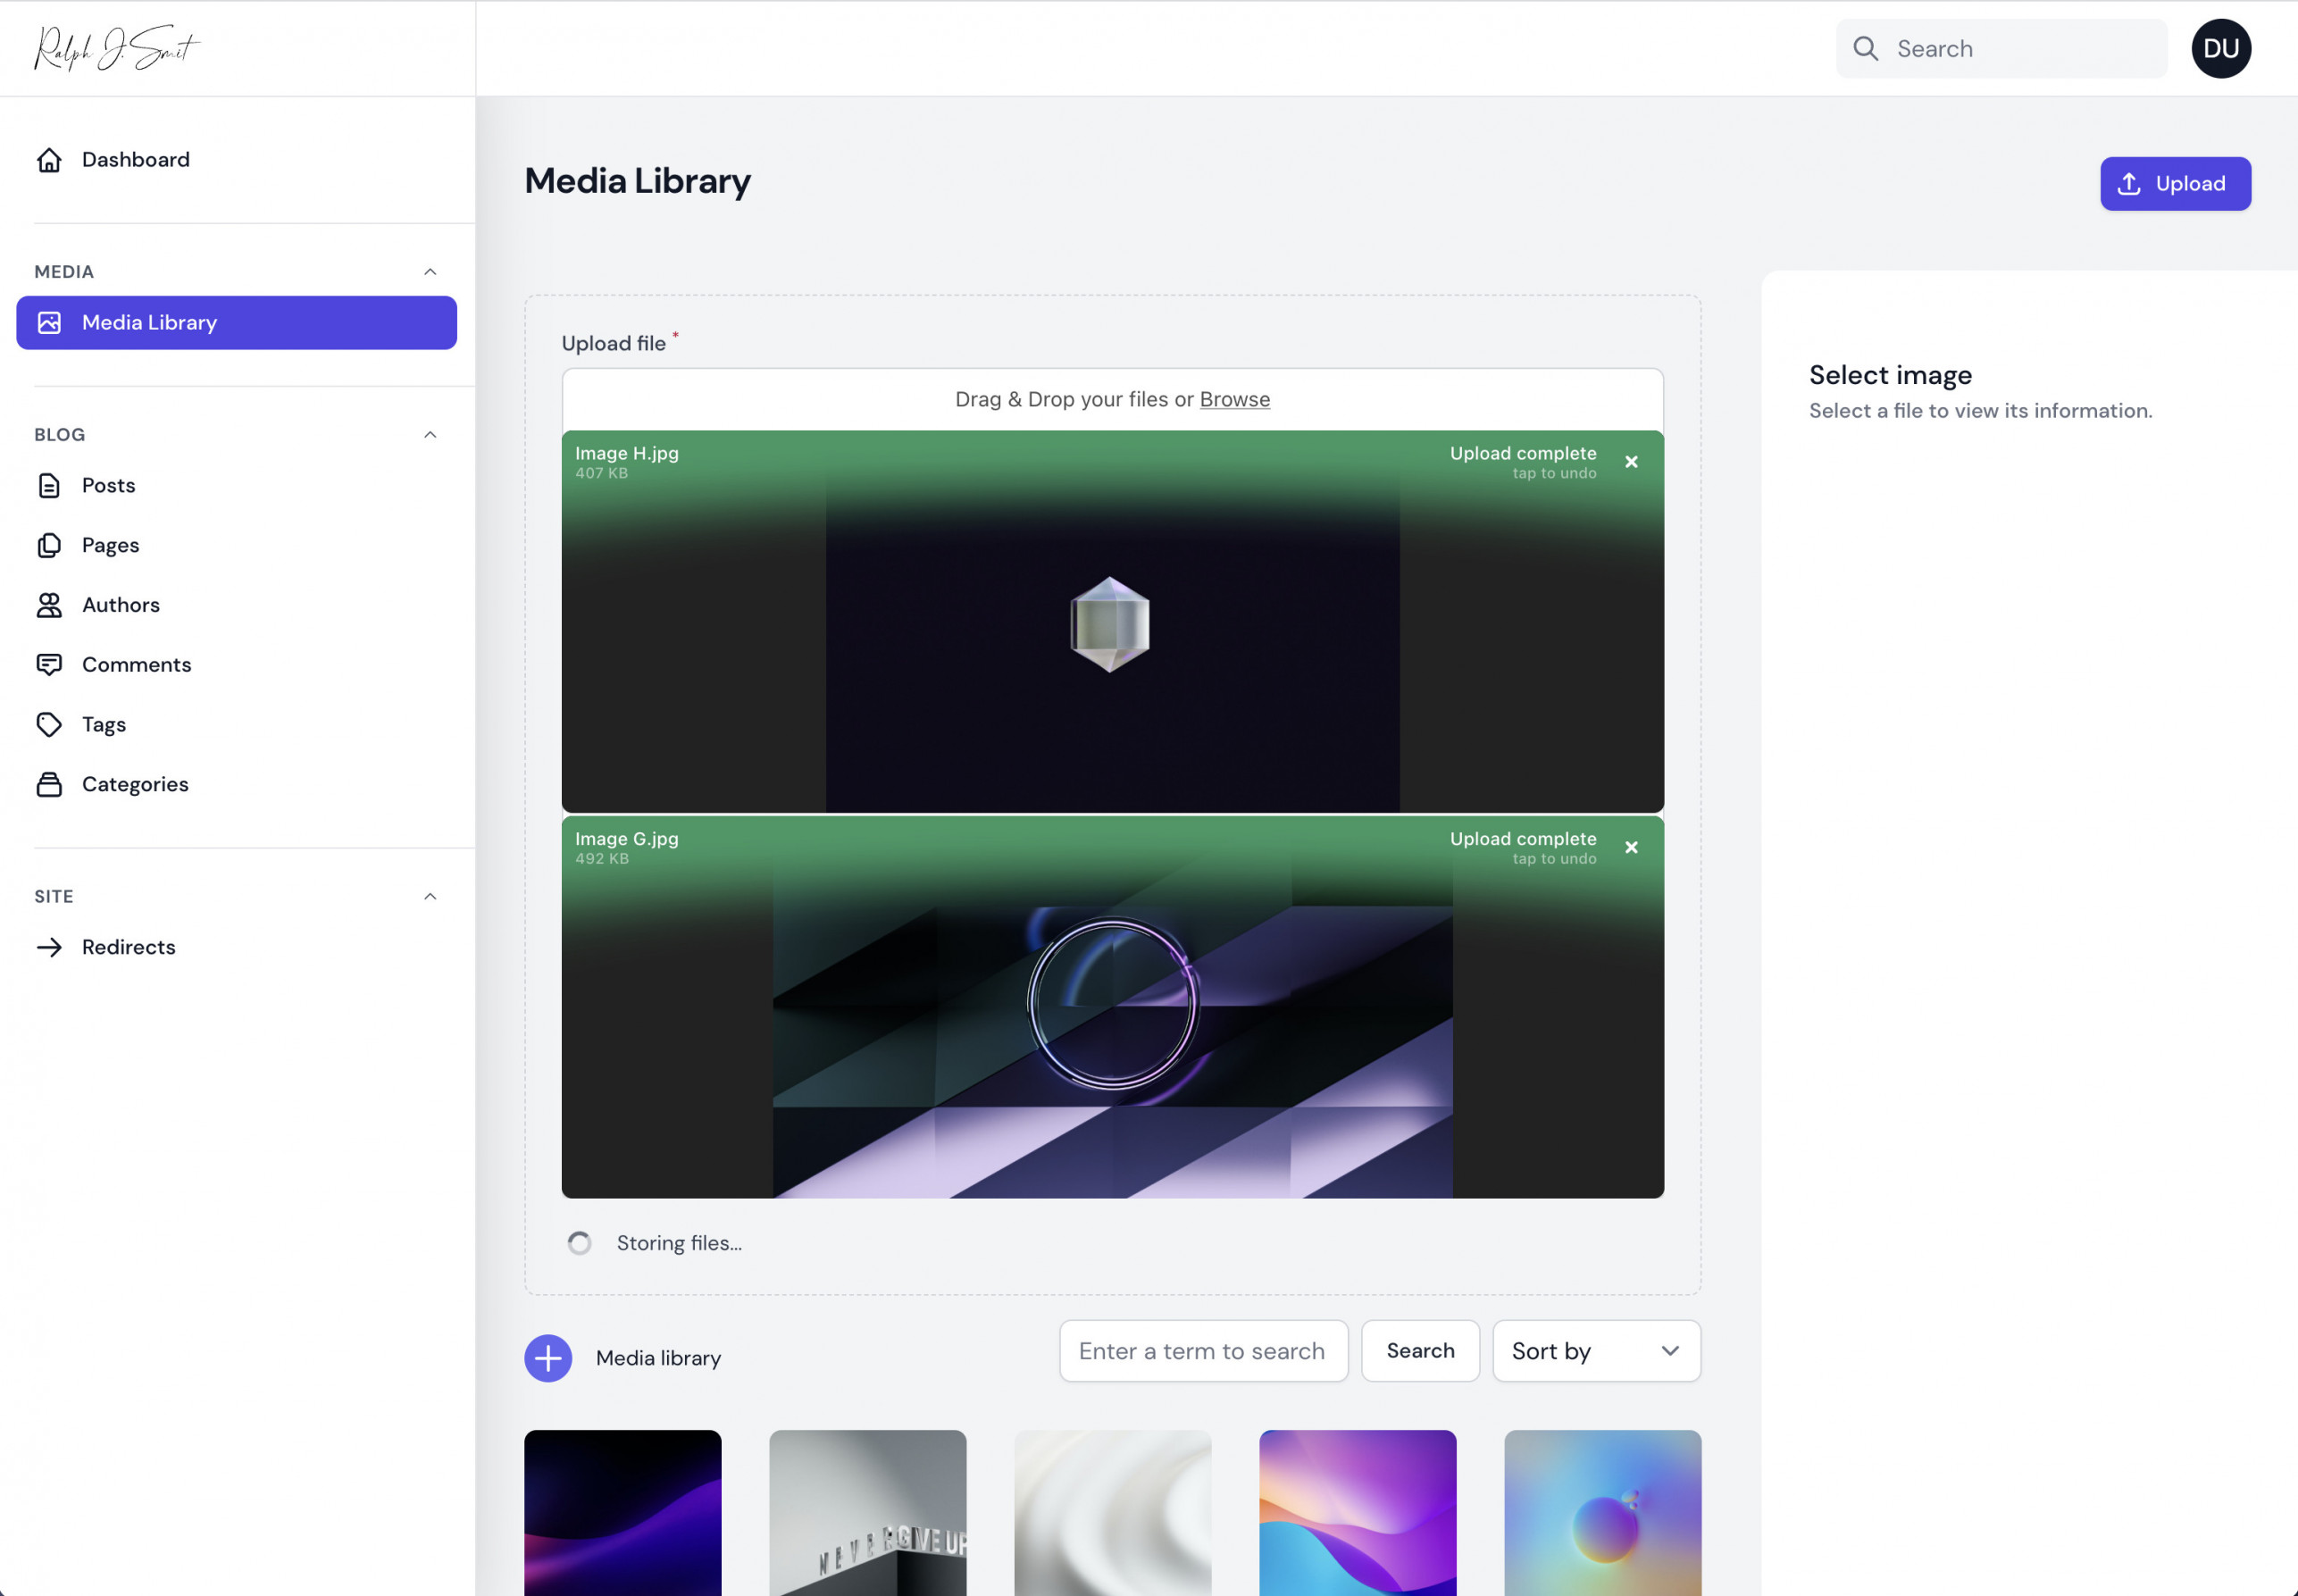
#Upload & bulk upload
Users can drag-and-drop their images unto the upload component. Bulk uploads are allowed. You can use Laravel's queue processing feature to handle the process of generating responsive images in the background.

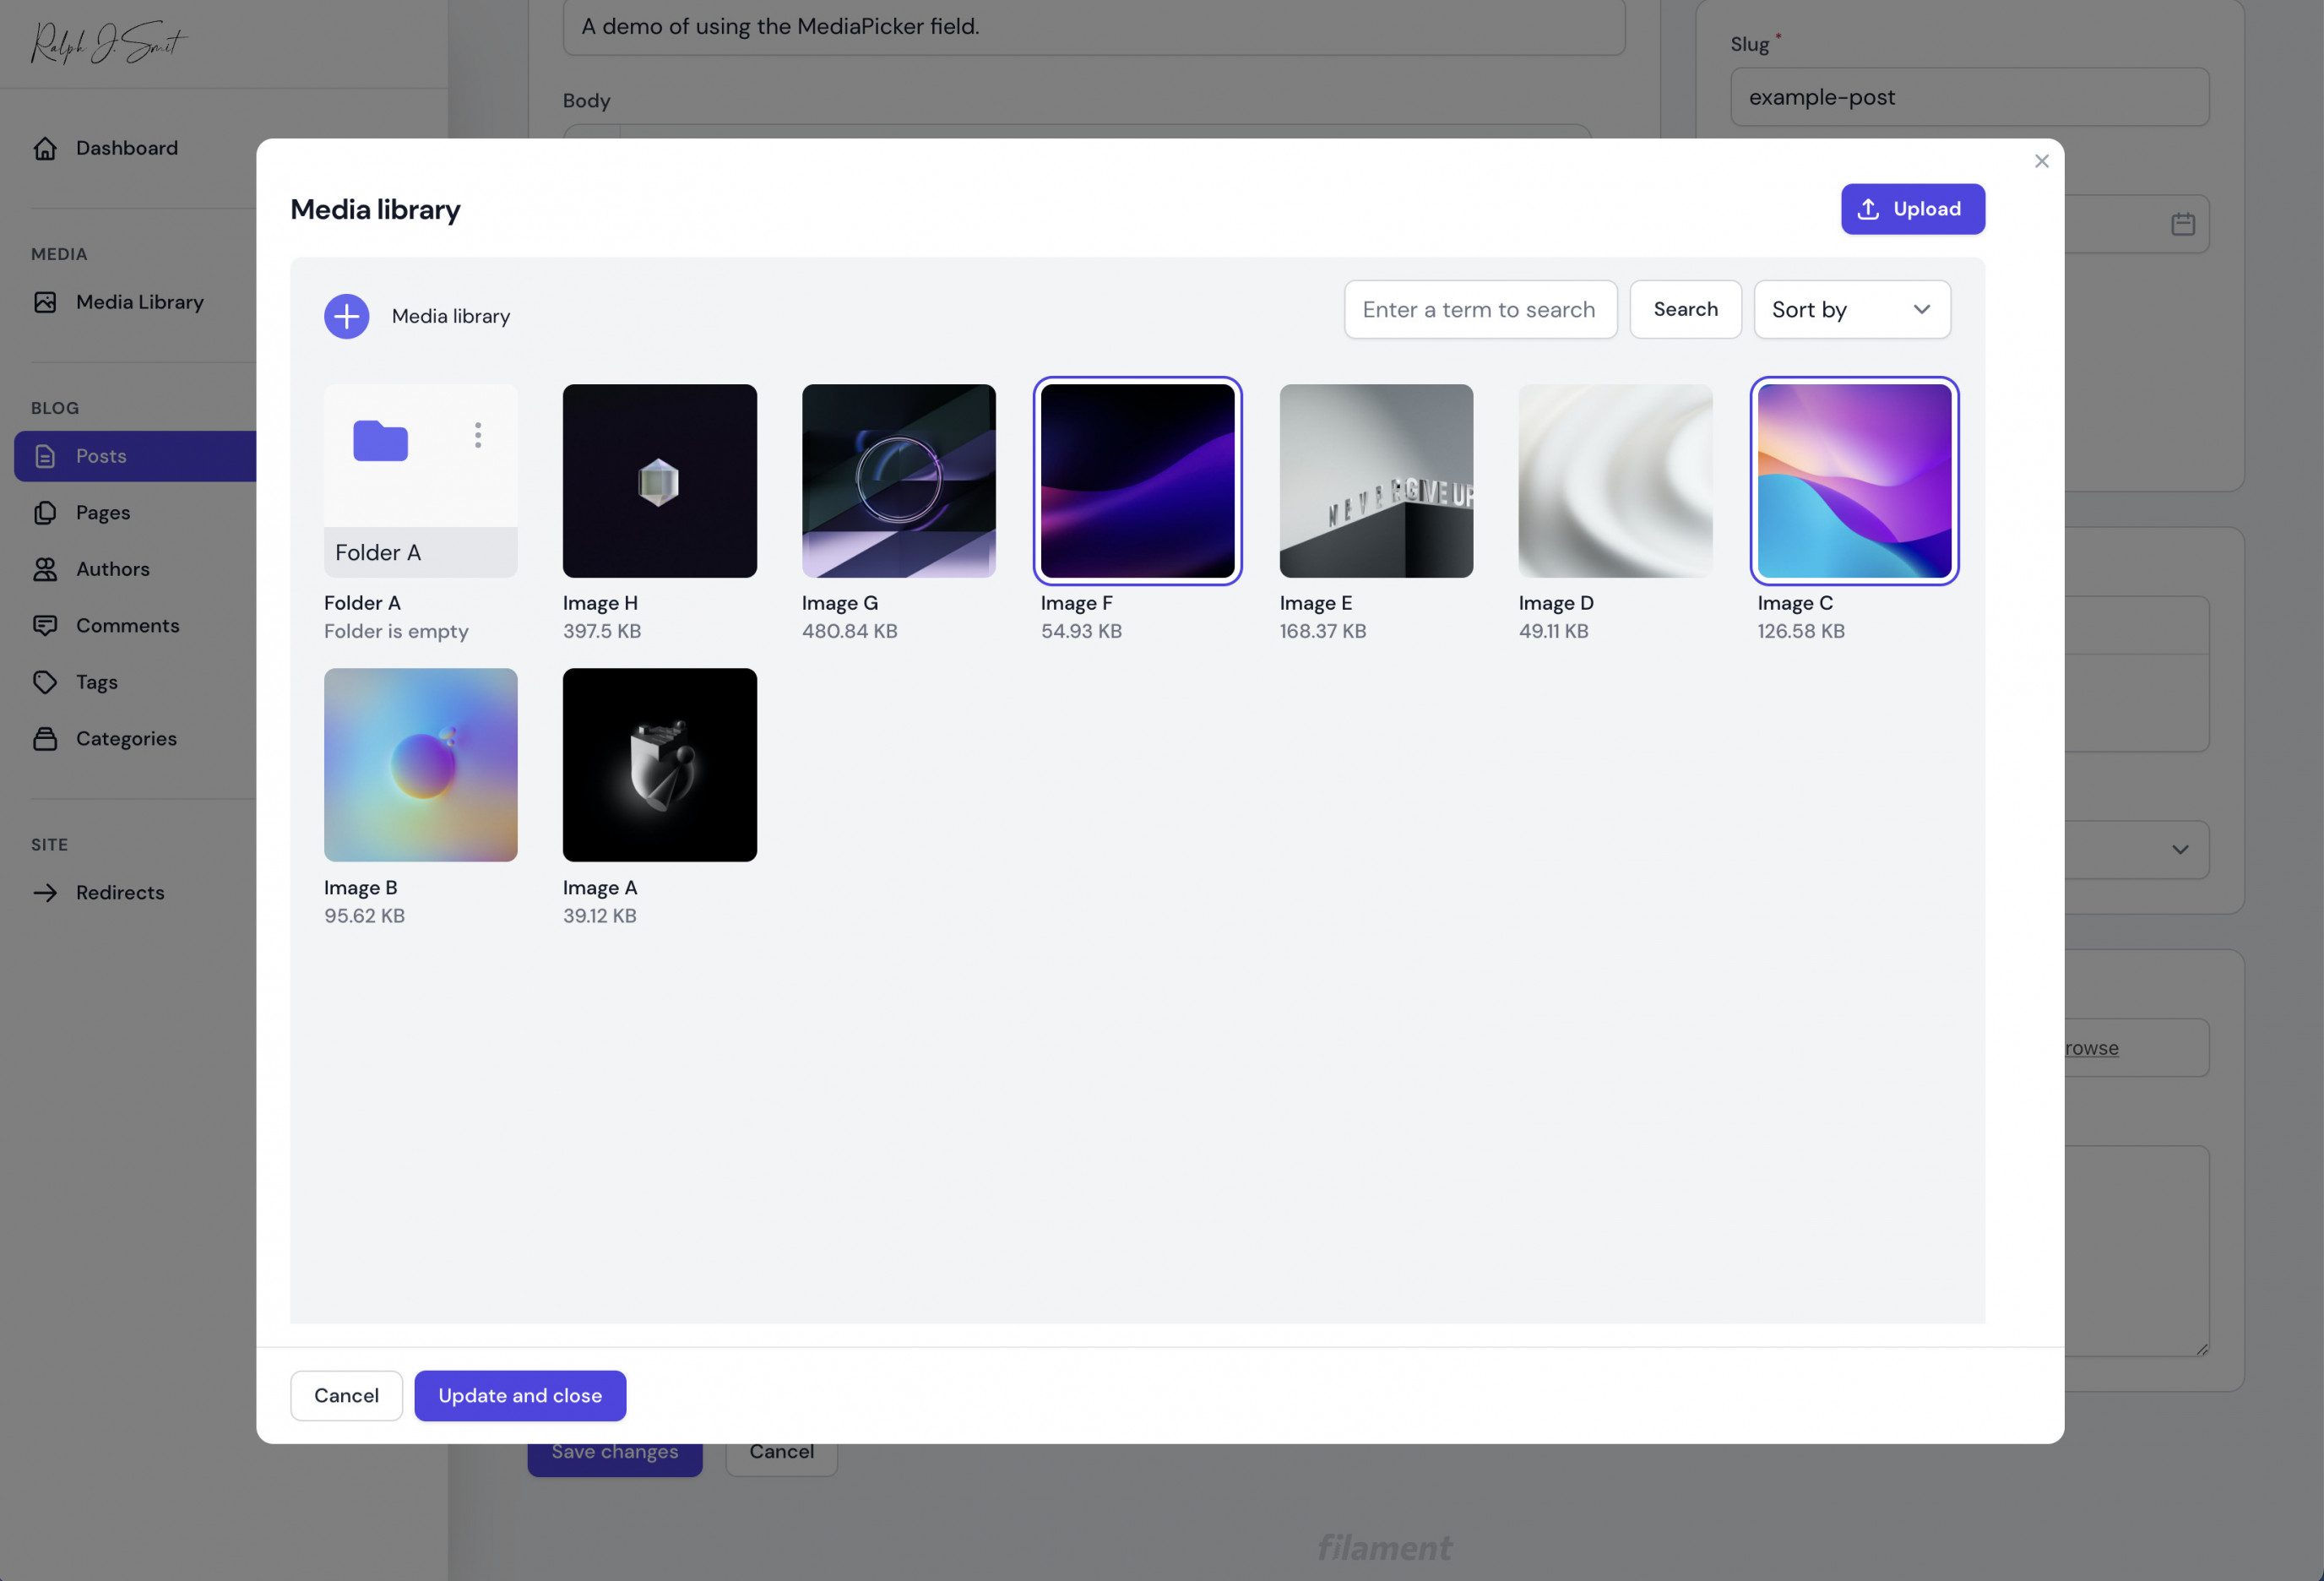
#MediaPicker Field & modal
You can use the MediaPicker Field everywhere inside the admin panel where you want it: as a single field or in a repeater. It works everywhere.

When a user clicks on 'Choose image', he/she will see the following modal, which they can use to pick an image.

Users can also pick multiple images at the same time (V2-feature):
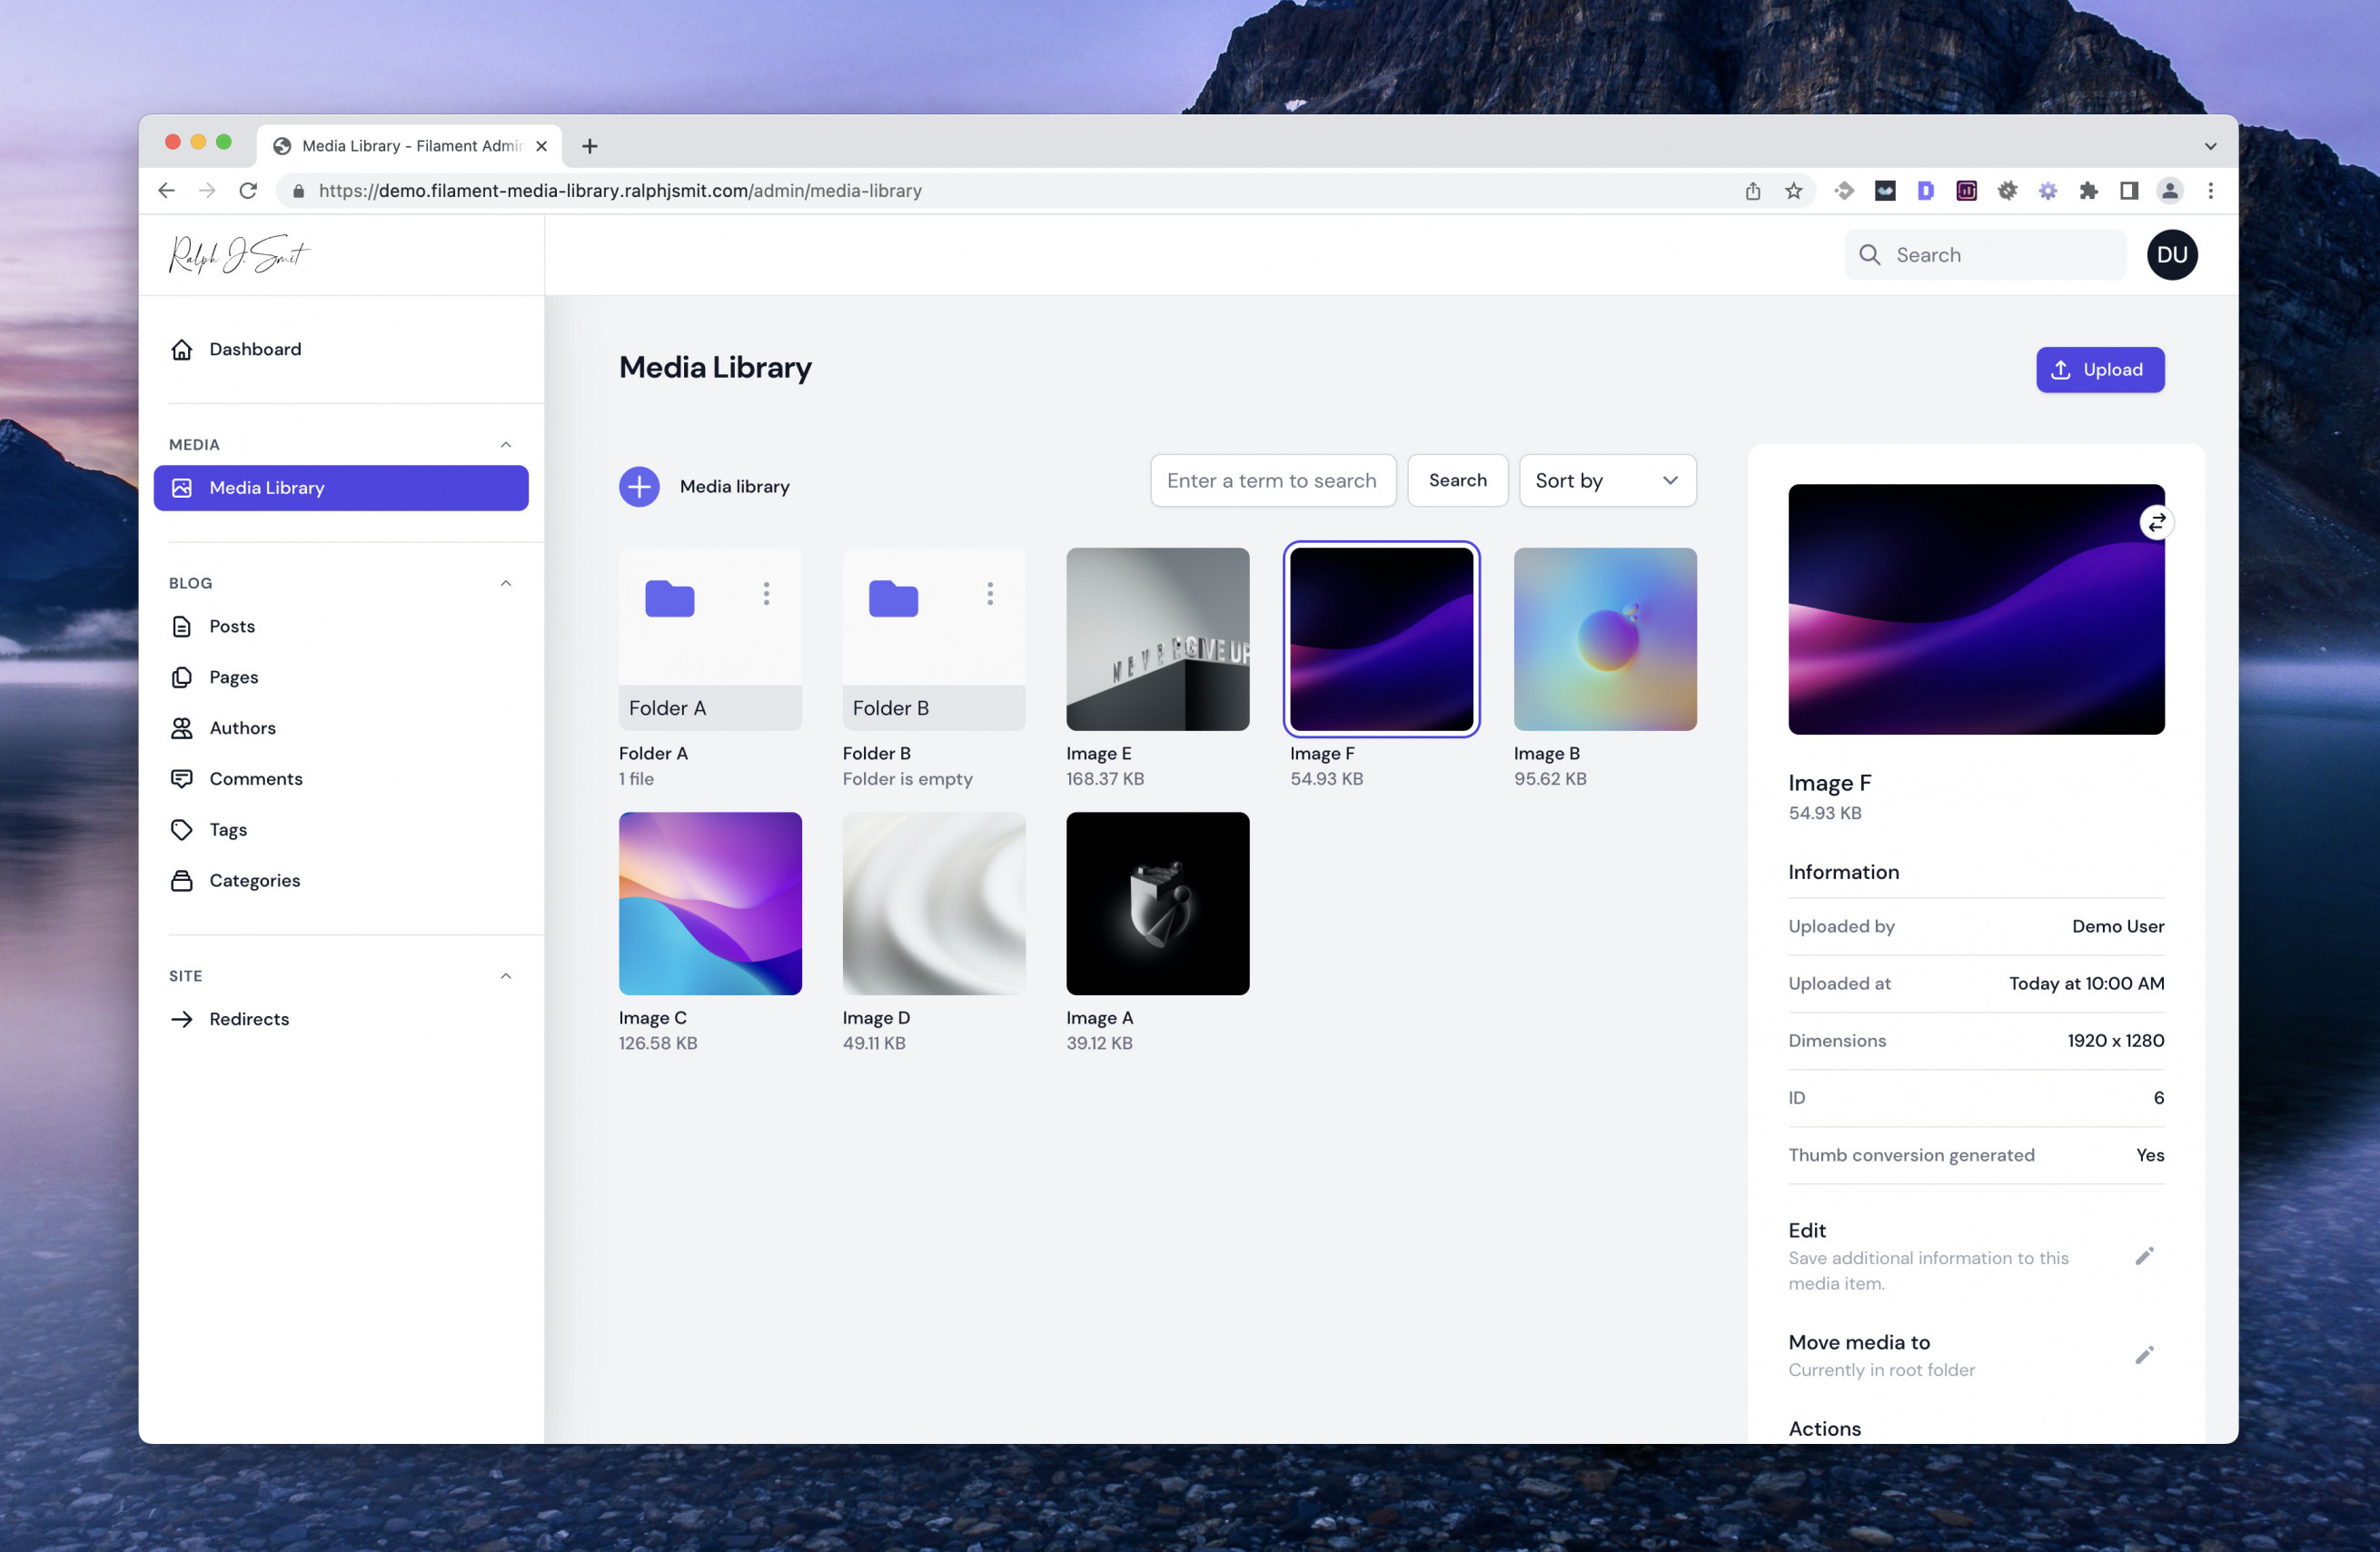
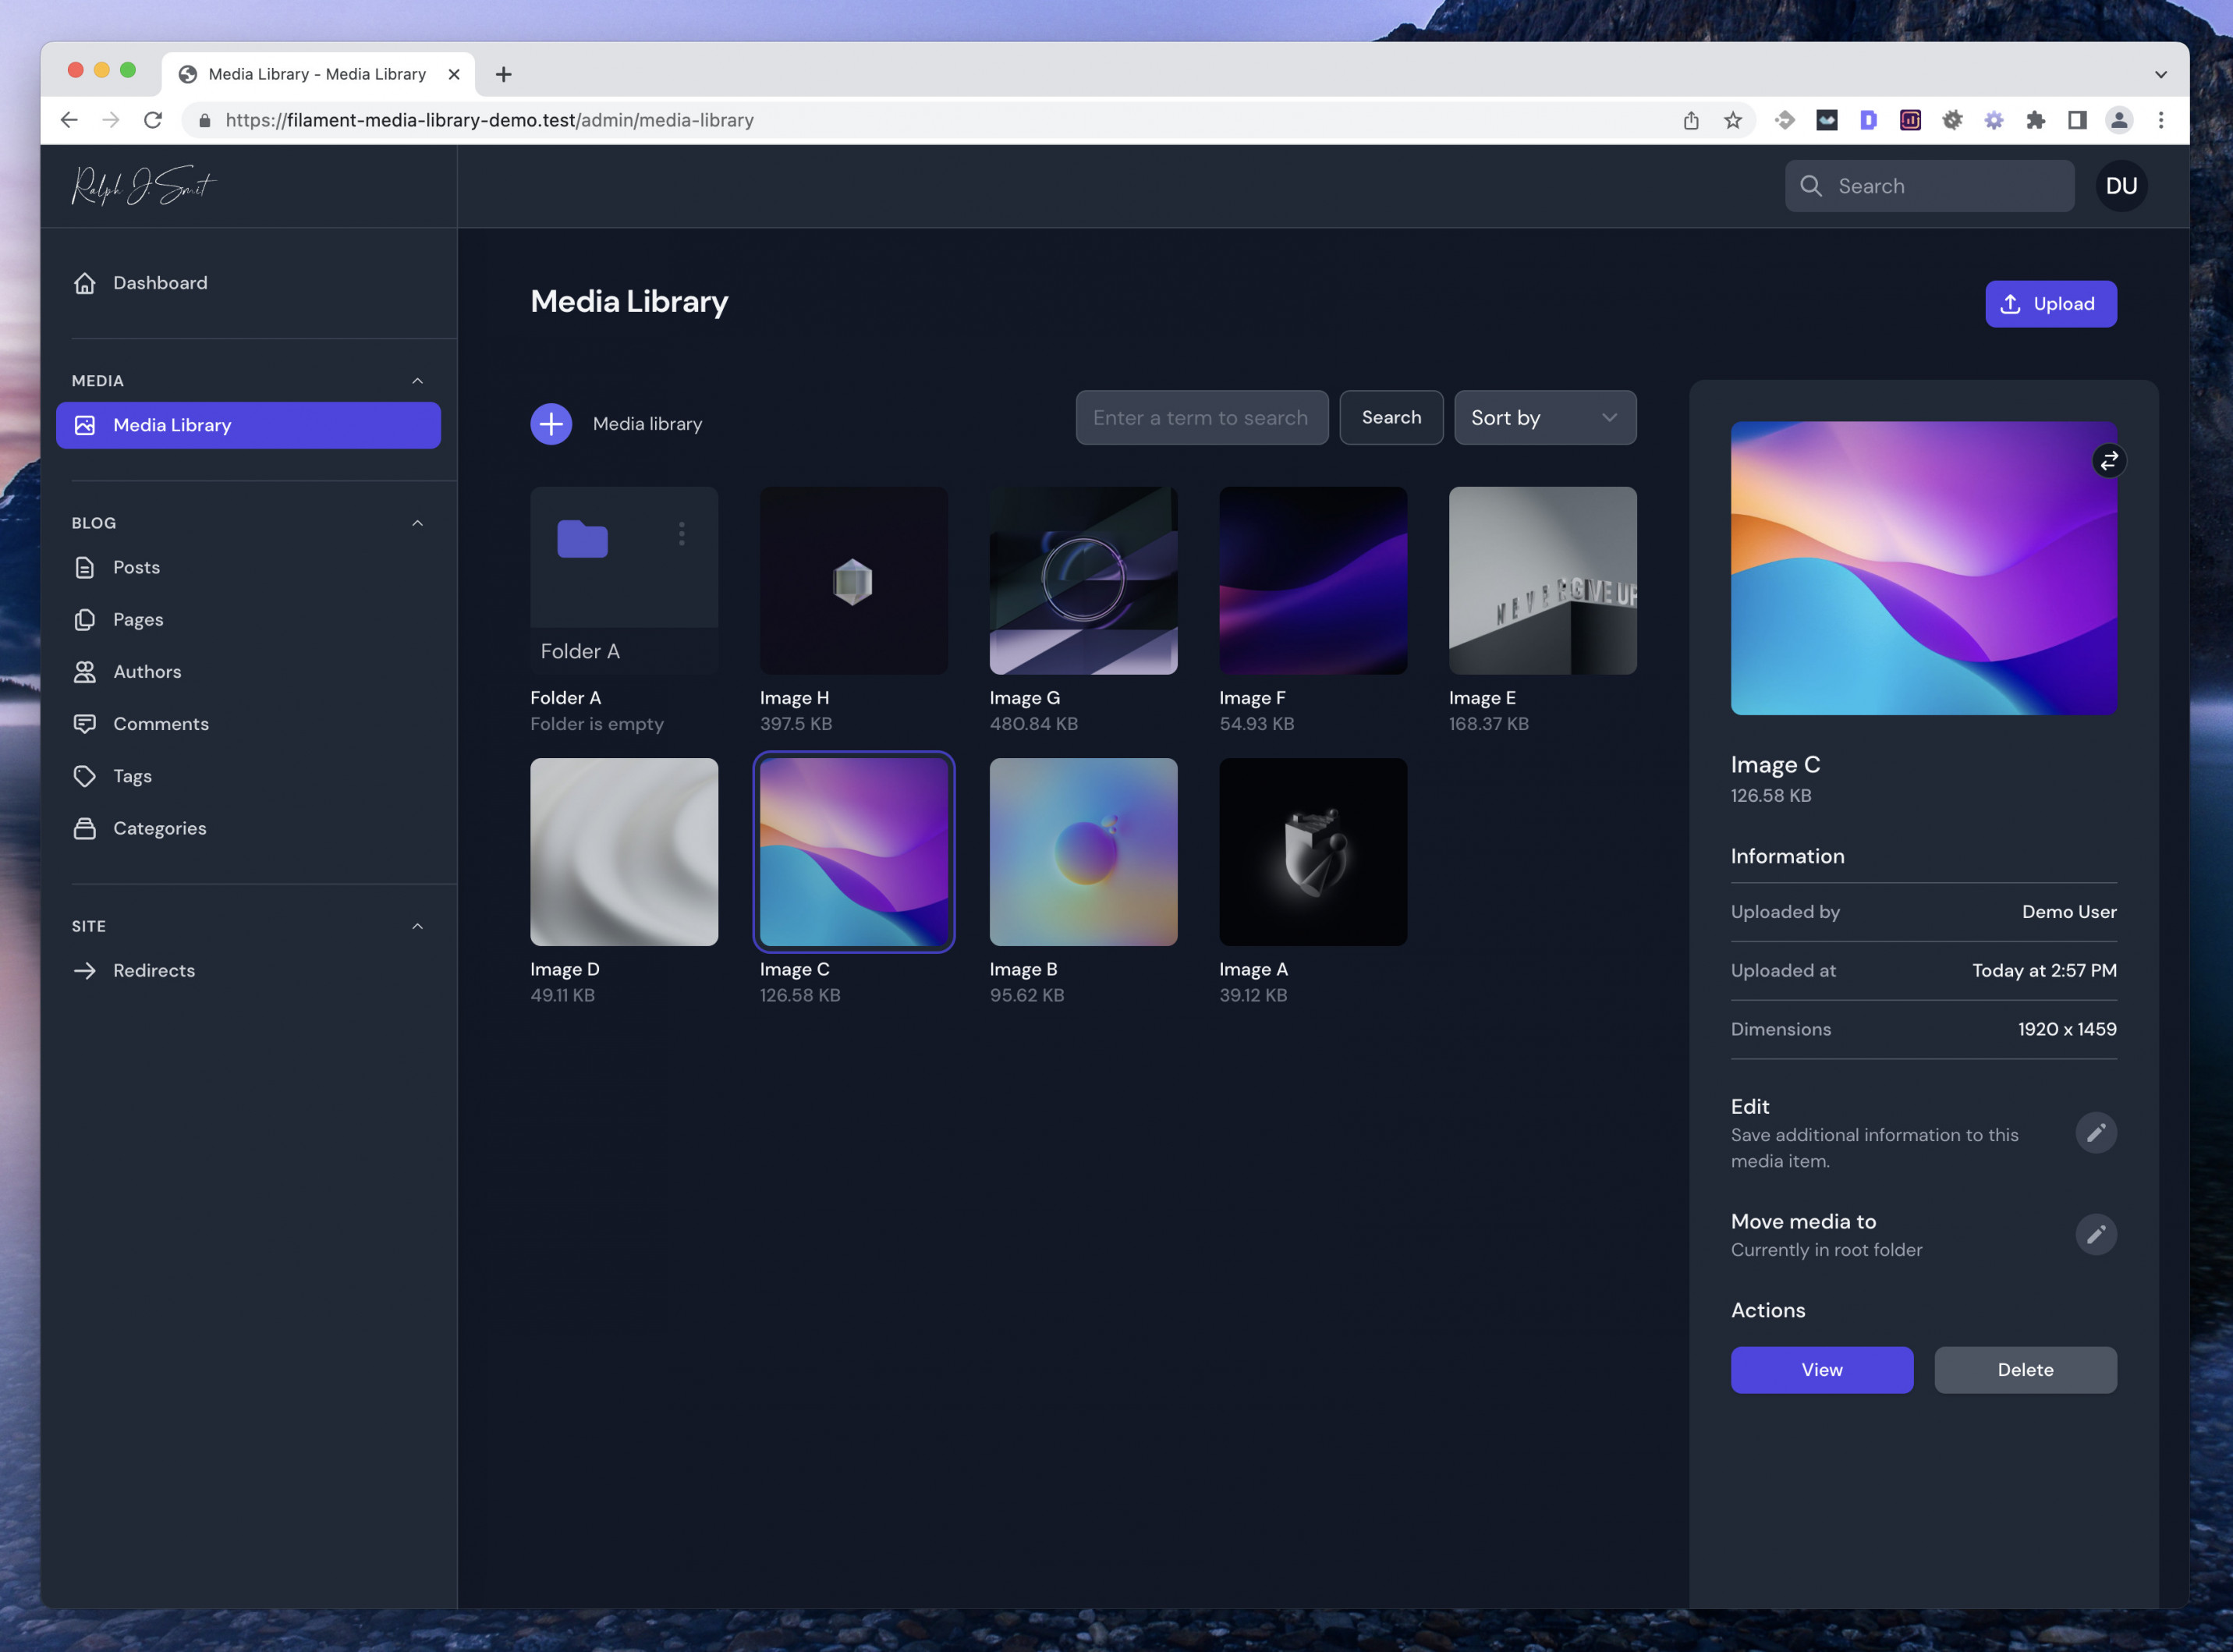
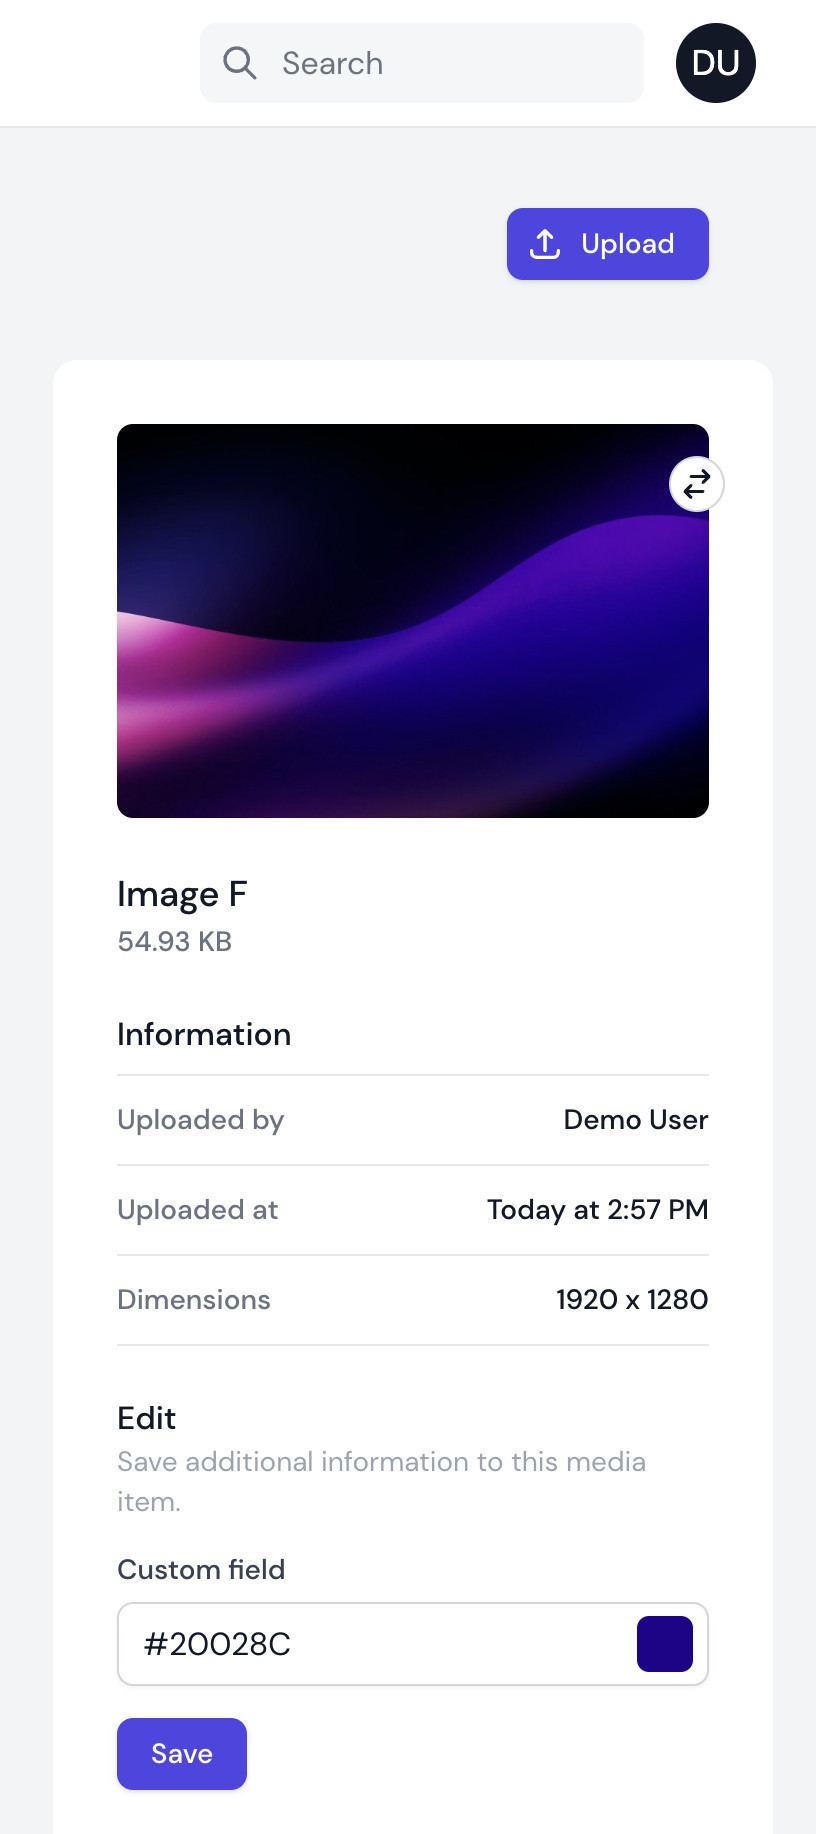
#Image detail
You can browse images using the UI:
For each image, you can view the image, view rows of information (can add custom rows) and edit each item using a custom form:
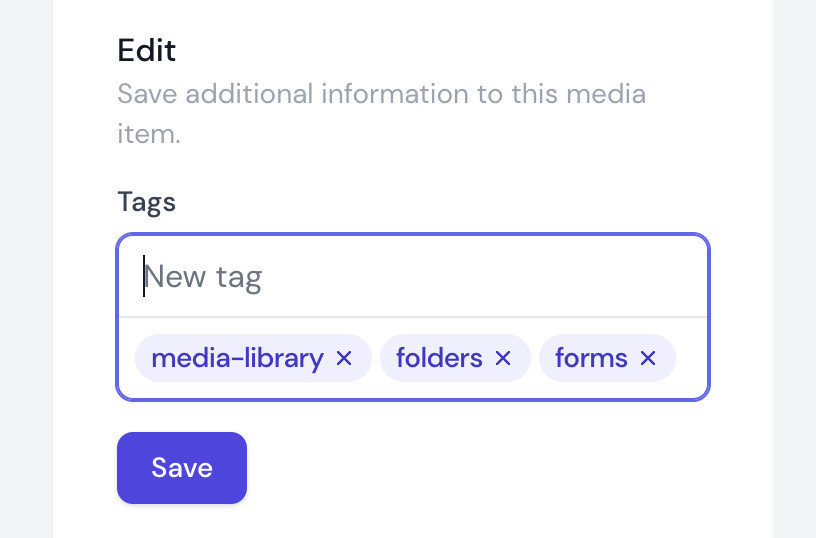
One of the use cases could be to allow adding tags to images:
#Default theme
By default Filament comes with it's own CSS, which integrates neatly into the admin panel design. However, as I did in the above screenshots, it is just as beautiful if you integrate it with your own Filament theme.
#Installation guide: A Convenient Media Library for Filament Admin
Thank you for purchasing the ultimate Media Library plugin for Filament Admin!
We tried to make the library as easy-to-install and versatile as possible. Nevertheless, if you still have a question or a feature request, please send an e-mail to [email protected].
In this guide I'll show you how to install the library, so you can start using it right away.
#Installation
#Prerequisites
For these installation instructions to work, you'll need to have the Filament Admin package installed and configured.
The package makes use of the Spatie MediaLibrary package. If you already have this package installed, you can skip this step.
composer require spatie/laravel-medialibrary
We'll need to publish the required migration first by running the following Artisan command.
php artisan vendor:publish --provider="Spatie\MediaLibrary\MediaLibraryServiceProvider" --tag="migrations"
The package is supported on Laravel 8, Laravel 9 and Laravel 10. Please be aware though that support for security fixes for Laravel 8 has ended.
You'll also need to have the ImageMagick PHP-extension installed on your system for the image conversions to happen. This is a relatively common extension and required by the underlying Spatie media library plugin. If you are using Laravel Sail, check out the section below.
#Installing ImageMagick on Laravel Sail
If you use Laravel Sail, installing ImageMagick requires a few additional steps. To get started, try the following steps:
- First, run
php artisan sail:publish to publish your DockerFiles.
- Then, open the DockerFile that corresponds to your PHP version (e.g.
docker/8.1/docker/Dockerfile for PHP 8.1).
- Add the
php8.1-imagick to the line with the PHP extensions (use the correct PHP version).
- Run
php artisan sail build --no-cache.
- Restart the container and continue with the installation.
#Installation via Composer
To install the package you should add the package to your composer.json file in the repositories key:
{
"repositories": [
{
"type": "composer",
"url": "https://filament-media-library-pro.composer.sh"
}
],
}
Next, you should require the package via the command line. You will be prompted for your username (which is your e-mail) and your password (which is your license key plus a colon ':' + the domain on which you activated it, e.g. 8c21df8f-6273-4932-b4ba-8bcc723ef500:mydomain.com).
composer require ralphjsmit/laravel-filament-media-library
After purchasing the plugin, you'll also be shown installation instructions with the appropriate credentials pre-filled.
Finally, you'll need to publish the migration and migrate the database:
php artisan vendor:publish --tag="filament-media-library-migrations"
php artisan vendor:publish --tag="filament-media-library-config"
# Optional to publish the config
php artisan migrate
#Setting up the disk / private disks (S3)
The Filament Media library uses the Spatie Medialibrary as underlying package. By default, the Spatie Medialibrary package will put your images on the public disk.
If you want to change the disk, publish the Spatie Medialibrary configuration file and update the disk_name value:
php artisan vendor:publish --provider='Spatie\MediaLibrary\MediaLibraryServiceProvider' --tag='config'
Then, update the following part of the media-library config with your new disk. This could be an S3 disk for example.
/*
* The disk on which to store added files and derived images by default. Choose
* one or more of the disks you've configured in config/filesystems.php.
*/
'disk_name' => env('MEDIA_DISK', 'public'),
#Private disks, like S3 (V2)
Next, if your disk is a private disk (like S3 in some cases), then you need to update the following two things.
First, update the media-library.url_generator to be RalphJSmit\Filament\MediaLibrary\UrlGenerator\MediaLibraryUrlGenerator::class instead of the default:
/*
* When urls to files get generated, this class will be called. Use the default
* if your files are stored locally above the site root or on s3.
*/
'url_generator' => RalphJSmit\Filament\MediaLibrary\UrlGenerator\MediaLibraryUrlGenerator::class,
Next, update the filament-media-library.disk.visibility value to “private”:
// By default, this package assumes that the disk you are using is public. If your
// disk is private, update the below "visibility" setting here to "private".
'disk' => [
'visibility' => 'public', // "public" or "private"
],
Now all the URLs should be generated using temporary signed URLs!
#Custom themes
If you're using a custom theme, you'll need to instruct Tailwind
to also purge the view-files for the media library. Add the following key to the content key of your tailwind.config.js file:
content: [
// Your other files
'./vendor/ralphjsmit/laravel-filament-media-library/resources/**/*.blade.php'
],
Next, you'll also need to disable the loading of our default stylesheet, because we don't want to load unnecessary CSS. Set the filament-media-library.register.default_css to false.
#Usage
Using the media library is very simple. After installing it, you should see a new page in your sidebar called "Media library". On this page your users can upload images, view their other images, edit metadata and delete images.
#Technical details
It might be handy to know a bit about how the media library works under-the-hood. Each item in your media library is an instance of the RalphJSmit\Filament\MediaLibrary\Media\Models\MediaLibraryItem Eloquent model. This model is used to store metadata about the image.
For example, if you have 10 images in your library, you will also have 10 MediaLibraryItem models with metadata.
#Manually adding uploaded files
Adding an image can be done via the static addUpload method on the MediaLibraryItem class. This method accepts an instance of Illuminate\Http\UploadedFile.
use RalphJSmit\Filament\MediaLibrary\Media\Models\MediaLibraryItem;
$uploadedFile = /** */;
$mediaItem = MediaLibraryItem::addUpload($uploadedFile);
You only need to know the above information if you want to manually add uploaded files.
The image files itself are being stored by the Spatie MediaLibrary package. The files are stored in a collection called library.
#Manually adding files from a path
Sometimes you don't have an instance of an UploadedFile ready, but you only have a path to the image. That situation is also possible, though it requires a little bit more work.
$path = /** */;
$originalFileName = 'test.jpg';
$uploadedFile = UploadedFile::createFromBase(new \Symfony\Component\HttpFoundation\File\UploadedFile($path, $originalFileName));
MediaLibraryItem::addUpload($uploadedFile);
#Customizing the page
If you want to override the title or navigation label, you can create a new class in your project that extends the \RalphJSmit\Filament\MediaLibrary\Media\Pages\MediaLibrary page. In this class you can override everything you want to customize, like the title, navigation label or navigatin group.
Finally, you should update the filament-media-library.register.pages config option to use your own new page instead of the default page.
#MediaPicker
This plugin comes with a custom Filament field called a MediaPicker. This field can be used to choose an image from the library. The field looks like this:
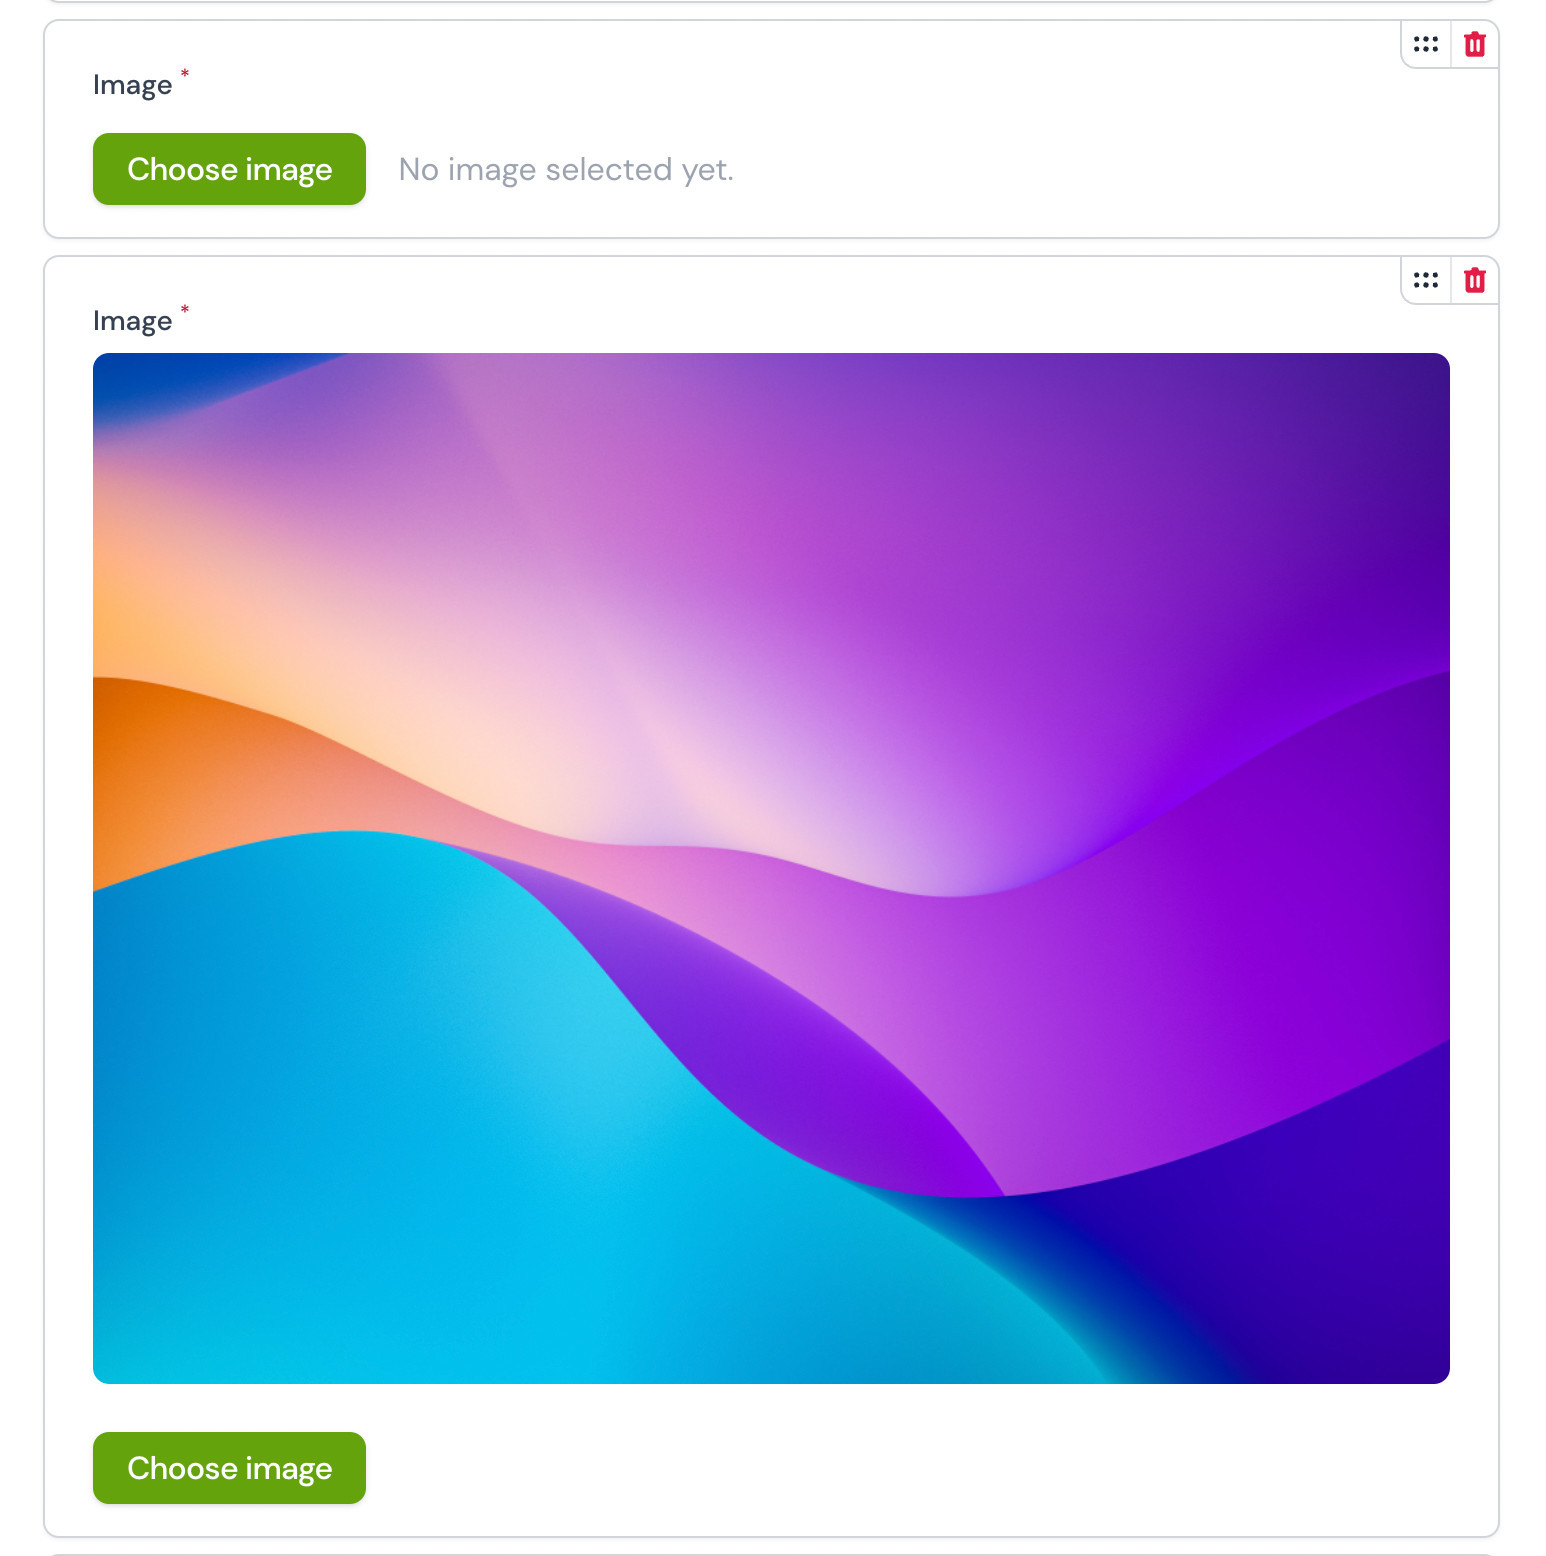
The field can be used anywhere you want: it behaves just like a normal field.
The field consists of two things:
- A part that is always visible.
- A modal to browse the actual media library.
Include the field like this:
MediaPicker::make('image')
->label('Choose image')
->required(),
The value of the field will be the id of the MediaLibraryItem that is being selected.
#Selecting multiple items in the media picker
You can use the ->multiple() to select multiple items using the MediaPicker component:
MediaPicker::make(‘images’)
->label(‘Choose images’)
->required()
->multiple(),
The value of the field will be an array with the id’s of the MediaLibraryItem’s that are being selected.
#Reordering multiple items in the media picker
If you are allowing your users to select multiple items, you can use the ->reorderable() method to allow your users to reorder the images. This can be useful in situations where the order of the media matters, for example if you want to construct a slideshow or carousel.
MediaPicker::make(‘images’)
->label(‘Choose images’)
->required()
->multiple()
->reorderable(),
The value of the field will be an array with the id’s of the MediaLibraryItem’s that are being selected, in the order that they were selected.
If a user hovers over an image, the cursor will change into a “move” icon, so that it is clear that the media can be reordered.
#Displaying images on your site
The MediaPicker component will store the id of the MediaLibraryItem model. To display an image, you can use that id to find the appropriate model.
Each model has a related Spatie\MediaLibrary\MediaCollections\Models\Media model. You can use this Media model to retrieve URLs, paths & other properties. You can use all the methods described in the Spatie MediaLibrary documentation.
$id = /** You stored this */
$mediaLibraryItem = MediaLibraryItem::find($id);
$spatieMediaModel = $mediaLibraryItem->getItem();
$url = $spatieMediaModel->getUrl();
$path = $spatieMediaModel->getPath();
//
We also provided support for the responsive images feature from Spatie.
#Deleting an image
If you want to delete an image, please delete the MediaLibraryItem model and not Spatie's Media model. Spatie's Media model is automatically deleted when you delete the original MediaLibraryItem model.
#Adding custom forms for editing media library items (NEW IN V2)
By default, people can edit the caption and alt text of a media library item. If you want to add more fields or remove the default fields, you can do so by providing a callback to the MediaLibrary::registerMediaInfoFormFields()-method in the boot() method of a service provider.
This example will show you how to add a color picker to the form.
First, you need to create a migration to add the column in which we will save the hex-code:
Schema::table('filament_media_library', function(Blueprint $table) {
$table->string('main_color')->nullable()->after('alt_text');
});
use Filament\Forms\Components\ColorPicker;
use RalphJSmit\Filament\MediaLibrary\Facades\MediaLibrary;
use RalphJSmit\Filament\MediaLibrary\Media\Models\MediaLibraryItem;
MediaLibrary::registerMediaInfoFormFields(function (array $schema, MediaLibraryItem $mediaLibraryItem): array {
return array_merge($schema, [
ColorPicker::make('main_color')
->label('Main color'),
]);
});
You can also remove the default fields by not merging them with the new fields:
MediaLibrary::registerMediaInfoFormFields(function (array $schema, MediaLibraryItem $mediaLibraryItem): array {
return [
ColorPicker::make('main_color')
->label('Custom field'),
];
});
If you want to hide all the fields, you can return an empty array:
Facades\MediaLibrary::registerMediaInfoFormFields(function (array $schema, MediaLibraryItem $mediaLibraryItem): array {
return [];
}, merge: false);
#Adding tags to media library items (NEW IN V2)
This example will show you how to add tags to your media library items based on the Filament Spatie Tags plugin. I will assume you have already run the migrations. You can find the installation instructions here.
Next, you need to prepare the Eloquent model for attaching tags. That means that we need to add a trait to the MediaLibraryItem Model. In order to achieve that, create a new file in your project with the name MediaLibraryItem, that extends the original MediaLibraryItem model and adds the HasTags-trait. You could do this in your own app/Models directory, but you are free to choose your own.
class MediaLibraryItem extends \RalphJSmit\Filament\MediaLibrary\Media\Models\MediaLibraryItem
{
use HasTags;
}
Then, register the tags input with the facade:
MediaLibrary::registerMediaInfoFormFields(fn (array $schema): array => [
...$schema,
SpatieTagsInput::make('tags'),
]);
This is how the end-result will look like:
#Adding custom information rows to media items (NEW IN V2)
When viewing a media item in your library, you might notice that there are some extra rows of information displayed. You can overwrite the existing rows or add custom rows by providing a callback to the MediaLibrary::registerMediaInfoInformationUsing().
use RalphJSmit\Filament\MediaLibrary\Facades\MediaLibrary;
use RalphJSmit\Filament\MediaLibrary\Media\DataTransferObjects\MediaItemMeta;
use RalphJSmit\Filament\MediaLibrary\Media\Models\MediaLibraryItem;
MediaLibrary::registerMediaInfoInformationUsing(function (array $information, MediaLibraryItem $mediaLibraryItem, MediaItemMeta $mediaItemMeta): array {
return array_merge($information, [
'ID' => $mediaLibraryItem->getKey(),
'Thumb conversion generated' => $mediaLibraryItem->getItem()->hasGeneratedConversion('thumb') ? 'Yes' : 'No',
]);
});
#Policies
The media library package offers support for policies. This allows you to determine whether a user can create a new media library item/folder or delete an old item/folder.
#Media library item
Supported checks for media library items are:
First, create a policy (e.g. in app/Policies) with the following contents:
<?php
namespace App\Policies;
class MediaLibraryItemPolicy
{
public function create(User $user): bool
{
//
}
public function delete(User $user, MediaLibraryItem $mediaLibraryItem): bool
{
//
}
}
Next, open up your AuthServiceProvider and register the policy for the model:
protected $policies = [
MediaLibraryItem::class => MediaLibraryItemPolicy::class,
];
Now you are ready and the create and delete actions are governed by a policy.
This will cause two new rows in the table to show up.
#Media library folder (V2)
Supported checks for media library folders are:
First, create a policy (e.g. in app/Policies) with the following contents:
<?php
namespace App\Policies;
class MediaLibraryFolderPolicy
{
public function create(User $user): bool
{
//
}
public function delete(User $user, MediaLibraryFolder $mediaLibraryFolder): bool
{
//
}
}
Next, open up your AuthServiceProvider and register the policy for the model:
protected $policies = [
MediaLibraryFolder::class => MediaLibraryFolderPolicy::class,
];
Now you are ready and the create and delete actions are governed by a policy.
#Registering custom media conversions
By default, the plugin registers four media conversions. The media conversions are:
-
responsive
-
400
-
800
-
thumb
These conversions are used throughout the plugin, so you cannot remove them. However, you are free to register additional media conversions using the MediaLibrary::registerMediaConversions() function:
use RalphJSmit\Filament\MediaLibrary\Facades\MediaLibrary;
MediaLibrary::registerMediaConversions(function (MediaLibraryItem $mediaLibraryItem, Media $media = null) {
$mediaLibraryItem
->addMediaConversion('test');
// ..
});
You should place the above code in the boot()-method of a service provider. For example, the AppServiceProvider or a custom provider, e.g. MediaLibraryServiceProvider.
You are free to register as many conversions as you like. However, be aware that each new conversion takes up more disk space.
#Changing the conversion for thumbnails
By default, the plugin generates a square media conversion called thumb that is used to display each media item in the library.
If you wish, you can change the conversion that is displayed in the library by updating the filament-media-library.thumbnail-media-conversion in the config:
// You can change the media conversion that is used to display the previews in the library.
// The default conversion is `thumb`. This conversion is a square conversion and generated
// automatically already. However, you can change the conversion to any other conversion.
// Please keep in mind that square conversions that aren't large work best.
'thumbnail-media-conversion' => 'thumb',
#Enable uploading videos & PDFs
The media library also has support for uploading videos & PDFs. By default, these options are disabled, because they might need the installation of an addition library.
You can enable video and PDF-support using the configuration file:
// You can specify the filetypes you want your users to be able to upload.
'accepted_filetypes' => [
// There is no additional configuration needed for accepting images.
'image' => true,
// In order to upload PDFs, you need to have the "spatie/pdf-to-image" package configured correctly.
// This package is already required via Composer, but you need to make sure that the extension for
// imagick has been installed and that Ghostscript is installed. Check out the following link:
// https://github.com/spatie/pdf-to-image#requirements
'pdf' => false,
// In order to let your users upload videos, you need to have the FFmpeg binary installed. See
// the website of FFmpeg for installation instructions: https://ffmpeg.org/download.html.
'video' => false,
],
#Changing the width of the media picker modal
You can update the width of the media picker modal using the filament-media-library.modals.media-picker.width setting in the config. The default width is 7xl.
'modals' => [
'media-picker' => [
'width' => '7xl',
],
],
#Showing the upload box by default (NEW IN V2)
It is possible to show the upload box by default instead of having to open the box first by clicking the 'upload'
button. Depending on your application, this might improve the user experience.
To enable this behaviour, set the filament-media-library.settings.show-upload-box-by-default to true:
'settings' => [
'show-upload-box-by-default' => true,
],
#Showing a warning box when there are unstored files in the upload box (NEW IN V2)
When uploading files, it is required for the user to click the button "Store" in order to upload the files and push them to the server. The reason for this behaviour instead of auto-upload, is two-fold.
- It will give the user the ability to remove a selected file and select a different file instead
- Technically, auto-uploading won't work well with Livewire in situations where users bulk upload 3 or more files
This can be confusing for some users. Some users forget to click "Store" and therefore the uploaded files never reach your server.
In order to solve this problem and improve the UX, you can choose to enable a warning box when there are files in the upload box that are not stored yet. The warning will be "Don't forget to click 'store' to upload your file/files".
To enable the warning box, set the filament-media-library.settings.warning-unstored-uploads to true:
'settings' => [
'warning-unstored-uploads' => true,
],
#Adding a custom button label to the media picker (NEW IN V2)
By default, the button of the media picker component will display "Choose image". You can override this by providing your own (dynamic) translation via the ->buttonLabel() method:
MediaPicker::make('hero_image_id')
->buttonLabel('Choose hero image'),
#Overriding custom classes
The plugin provides several configuration options to override the internal classes it uses. This can be handy in situations where you want to make a small tweak to a certain behaviour or design.
Make sure to always extend the original class.
// Use the below setting to customize the model used for media library items.
// This allows you to override the model for an iten and customize it.
// Make sure to always extend the original model, so that you will not accidentally
// lose functionality or forget to upgrade functions.
'models' => [
'item' => MediaLibraryItem::class,
'folder' => MediaLibraryFolder::class,
],
// The resources and pages to enable in your application.
'register' => [
// From the below array, you can remove the pages you don't need.
// If you want to modify a page yourself, you can extend the original page
// and register your own class here that extends the page. In that way, you can
// customize labels, titles, etc.
'pages' => [
MediaLibrary::class,
],
// The below three classes are the main Livewire-components. If you want to modify
// one of the classes, you can create a new class that extends the original class
// and update the configuration here accordingly.
// NB.: Please note that I cannot guarantee that breaking changes will never happen
// inside these classes, so be sure to check if your changes still work after each update.
'livewire' => [
'upload-media' => UploadMedia::class,
'media-info' => MediaInfo::class,
'browse-library' => BrowseLibrary::class,
],
// ..
],
NB.: Please note that I cannot guarantee that breaking changes will never happen inside these classes, so be sure to check if your changes still work after each update.
#Using the MediaPicker outside the admin panel
It is also very easy to use the MediaPicker component outside the admin panel. To enable support for this, you should include the @mediaPickerModal Blade-directive on every page where you want to use the MediaPicker component.
The @mediaPickerModal directive should be added before the </body>-tag. Please make sure to only include the component once to prevent issues.
<!-- In your app.blade.php -->
<body>
<!-- ... -->
@mediaPickerModal
</body>
Or, on individual pages only:
@once
@mediaPickerModal
@endonce
#Upgrading from V1 to V2
Do you have the V1 and want to upgrade to V2?
You should have gotten an email with a link to upgrade for a small fee. If you did not get this email or if you want to get it earlier/again, please email me at [email protected].
#Support
If you have a question, bug or feature request, please e-mail me at [email protected] or tag @ralphjsmit on #media-library-pro on Discord. Love to hear from you!
🙋♂️ Ralph J. Smit
